
# 1.2 jfinal-undertow Development
# 1. Create a standard Maven Project
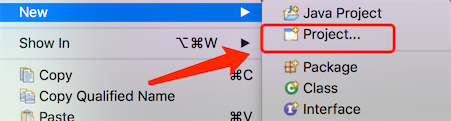
Select "new" from the Eclipse main menu, then select "project".
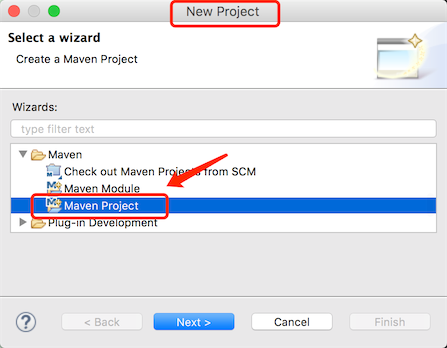
In the pop-up window, select "Maven Project", click the "next" button to proceed.
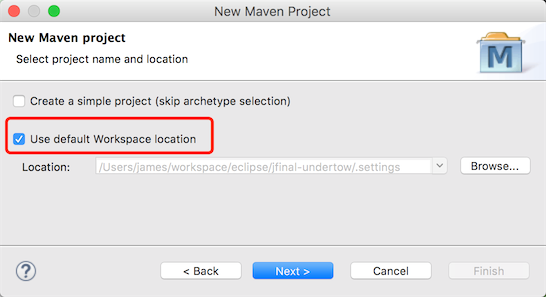
In the next window, check "Use default Workspace location" and click "next".
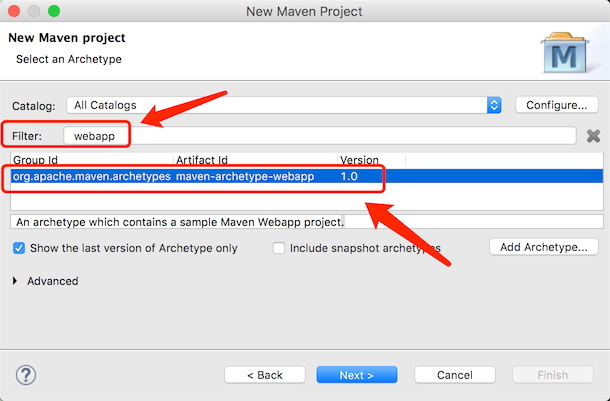
In the next window, enter "webapp" in the Filter bar, select "org.apache.Maven.archetypes Maven-archetype-webapp 1.0", and click "next".
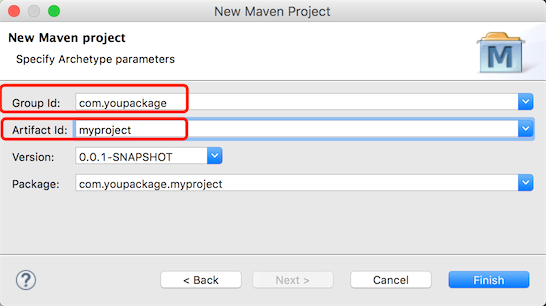
In the next window, enter the Group Id and Artifact Id, and click "finish" to complete the project creation.
Once created, the final directory structure is as follows:

Note: In some older versions of Eclipse, after the project is created, the "java" directory might be missing under the main directory. If this happens, you can manually create this directory.
# 2. Add jfinal-undertow and jfinal dependencies
Open the pom.xml file and add the following dependencies:
<dependency>
    <groupId>com.jfinal</groupId>
    <artifactId>jfinal-undertow</artifactId>
    <version>3.5</version>
</dependency>
<dependency>
    <groupId>com.jfinal</groupId>
    <artifactId>jfinal</artifactId>
    <version>5.1.2</version>
</dependency>
2
3
4
5
6
7
8
9
10
If you need WebSocket support, add another dependency; if you're not developing with WebSocket, you can ignore this.
<dependency>
    <groupId>io.undertow</groupId>
    <artifactId>undertow-websockets-jsr</artifactId>
    <version>2.2.24.Final</version>
</dependency>
2
3
4
5
# 3. Add a Java file
In the project src/main/java directory, create a demo package and within the demo package, create a DemoConfig file.
package demo;

import com.jfinal.config.*;
import com.jfinal.template.Engine;
import com.jfinal.server.undertow.UndertowServer;

public class DemoConfig extends JFinalConfig {
    /**
     * Note: The main method for starting can be created in any Java class. It's placed in DemoConfig here just for demonstration.
     * When developing the project, it's recommended to create a dedicated App.java or Start.java as the startup entry class to place the main method.
     */
    public static void main(String[] args) {
        UndertowServer.start(DemoConfig.class, 80, true);
    }
    public void configConstant(Constants me) {
        me.setDevMode(true);
    }
    public void configRoute(Routes me) {
    // jfinal 4.9.03 version added route scanning feature, no need to manually add routes
    // me.add("/hello", HelloController.class);
    // Use route scanning, the parameter "demo." means only scanning routes under the demo package and its sub-packages
        me.scan("demo.");
    }
    public void configEngine(Engine me) {}
    public void configPlugin(Plugins me) {}
    public void configInterceptor(Interceptors me) {}
    public void configHandler(Handlers me) {}
2
3
4
5
6
7
8
9
10
11
12
13
14
15
16
17
18
19
20
21
22
23
24
25
26
27
In the demo package, create the HelloController class file, the content is as follows:
package demo;
import com.jfinal.core.Controller;

@Path("/hello")
public class HelloController extends Controller {
    public void index() {
        renderText("Hello JFinal World.");
    }
}
2
3
4
5
6
7
8
9
jfinal 4.9.03 added a route scanning feature, for details please see: https://jfinal.com/doc/2-3
# 4. Start the Project
Right-click on the DemoConfig class file, select "Debug As", then select "Java Application" to run.

# 5. Open the browser to see the effect
Open the browser and enter in the address bar: http://localhost/hello, the output content is "Hello JFinal World" indicating that the project framework has been set up.
For a complete demo example, you can download from the official JFinal website homepage on the right side: http://www.jfinal.com
Note: jfinal-undertow does not support JSP by default. It is strongly recommended to use jfinal's default template engine, enjoy. Those who use it will find it pleasing. If you must use JSP, you can refer to the "JSP Support Issue" at the end of Chapter 1.5 of the documentation: https://jfinal.com/doc/1-5, or use jetty-server as the development environment: https://jfinal.com/doc/1-6